Peppermint Chocolate Thumbprint Cookies are soft, chewy, cocoa-rich cookies rolled in sugar and topped with creamy peppermint candy cane kisses. They’re festive, simple to make, and perfect for Christmas cookie swaps, holiday parties, or seasonal gifting.
Why You’ll Love This Recipe
You’ll love this recipe because it combines rich chocolate flavor with refreshing peppermint in the most delightful way. The cookies bake up soft and tender, while the peppermint kiss melts slightly to create a creamy, indulgent center. They’re easy, reliable, and irresistibly festive.

Peppermint Chocolate Thumbprint Cookies
Peppermint Chocolate Thumbprint Cookies are one of the most iconic flavors of the holiday baking season. They strike the perfect balance between rich chocolate and cool peppermint, making them irresistible for anyone who loves seasonal flavors. These cookies are everything you want in a Christmas treat—festive, fun, and perfect for sharing.
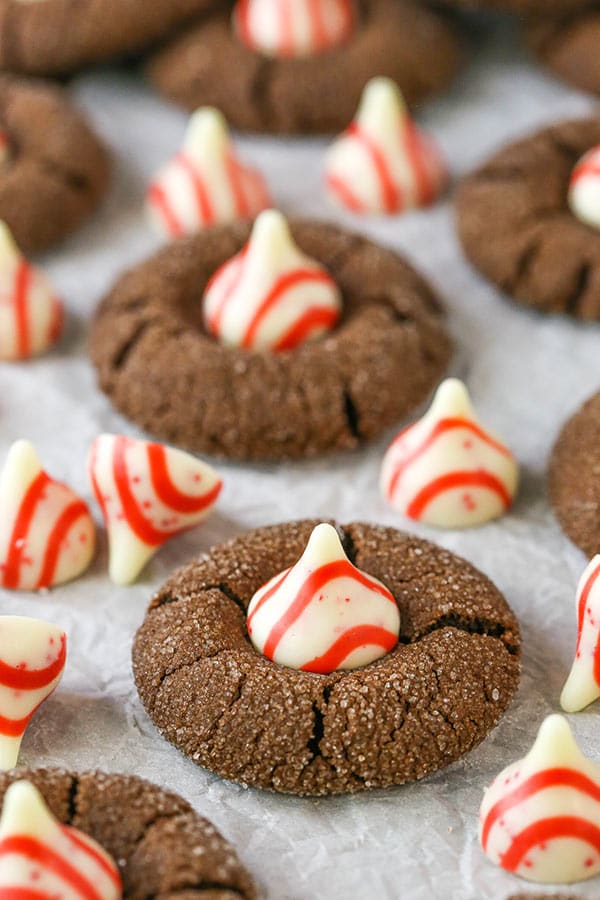
The base cookie is made with cocoa powder, giving it a deep chocolate flavor that pairs beautifully with the sweetness of the Candy Cane Hershey’s Kiss pressed on top. The texture is soft and chewy on the inside with a slight crisp along the edges, making each bite melt in your mouth. It’s a classic thumbprint cookie with a holiday twist.
Peppermint is one of the most beloved winter flavors because it brings freshness and warmth all at once. When combined with cocoa, it creates that nostalgic chocolate-mint pairing that instantly feels like Christmas. These cookies deliver that cozy holiday feeling with minimal effort.
One of the best features of this recipe is how quickly the cookies bake. In just 6–7 minutes, they puff up perfectly, creating the ideal base for pressing in the peppermint kisses. The heat slightly softens the candy, bonding it to the cookie while keeping its shape beautifully.
Rolling the dough in sugar before baking adds a delicate sparkle and enhances the edges with a thin crispness. This simple step elevates the appearance and the overall texture, making the cookies look bakery-worthy with almost no extra work.
The dough is easy to handle, requiring just standard pantry ingredients like butter, sugar, cocoa powder, and flour. There is no chilling needed, meaning you can go from mixing bowl to cooling rack in under 20 minutes. It’s the perfect recipe for busy holiday schedules.
These cookies are excellent additions to holiday cookie trays, gifting tins, school parties, or office treat boxes. Their vibrant red-and-white peppermint centers immediately catch the eye, adding a cheerful pop of festive color to any dessert spread.
Because this recipe yields about 26–28 cookies, it’s ideal for gatherings or batch baking. The cookies also store well, keeping their flavors strong and fresh for several days. They’re great for prepping ahead for holiday events or assembling snack boxes.
The peppermint kisses not only look beautiful but also taste creamy and smooth. As they set on the warm cookie, they create a soft, melt-in-your-mouth center that perfectly complements the rich chocolate base. The combination is festive, nostalgic, and absolutely delicious.
If you’re searching for a holiday cookie that’s easy, beautiful, and bursting with seasonal flavor, Peppermint Chocolate Thumbprint Cookies are the perfect choice. These cookies will instantly become a holiday favorite, treasured by kids and adults alike.
Servings & Time
Servings: 26–28 cookies
Prep Time: 15 minutes
Cook Time: 6–7 minutes
Cooling Time: 15 minutes
Total Time: ~30 minutes
Ingredients
-
10 tbsp (140g) unsalted butter, room temperature
-
½ cup (112g) brown sugar, lightly packed
-
½ cup (104g) sugar, plus 3 tbsp for rolling
-
1 egg
-
1 tsp vanilla extract
-
1¼ cups (163g) all-purpose flour
-
½ cup (57g) natural unsweetened cocoa powder
-
1 tsp baking soda
-
¼ tsp salt
-
26–28 Candy Cane Hershey’s Kisses
Instructions
-
Preheat oven to 350°F (176°C) and line a baking sheet with parchment or a silicone mat.
-
Mix flour, cocoa powder, baking soda, and salt; set aside.
-
Cream butter and both sugars (except the 3 tbsp for rolling) until light and fluffy.
-
Add egg and vanilla; mix well.
-
Add dry ingredients and mix until a thick dough forms.
-
Roll dough into 1-tablespoon balls.
-
Roll each ball in the extra 3 tbsp sugar to coat fully.
-
Arrange dough balls on the prepared baking sheet.
-
Bake for 6–7 minutes.
-
Immediately press a Candy Cane Kiss into the center of each cookie.
-
Let cool 2–3 minutes on the pan, then transfer to a rack to cool completely.
Tips
Ingredient Substitutions
-
Use dark cocoa powder for a richer chocolate flavor.
-
Replace vanilla extract with peppermint extract for extra mintiness.
-
Swap Candy Cane Kisses for Hugs, Milk Chocolate, or other seasonal flavors.
Make-Ahead & Storage
-
Store cookies in an airtight container for up to 5 days.
-
Freeze the baked cookies (unstacked) for up to 2 months.
-
Freeze the dough balls separately and bake from frozen—add 1 extra minute.
Serving Variations
-
Drizzle with melted white chocolate for decoration.
-
Add crushed candy canes on top immediately after baking.
-
Roll dough balls in colored sanding sugar for extra sparkle.
Avoid Common Mistakes
-
Don’t overbake—cookies should be soft when removed from oven.
-
Ensure kisses are unwrapped before baking to work quickly.
-
Don’t press the kiss too deeply; just a gentle push is enough.

Peppermint Chocolate Thumbprint Cookies
Ingredients
- 10 tbsp 140g unsalted butter, room temperature
- ½ cup 112g brown sugar, lightly packed
- ½ cup 104g sugar, plus 3 tbsp for rolling
- 1 egg
- 1 tsp vanilla extract
- 1¼ cups 163g all-purpose flour
- ½ cup 57g natural unsweetened cocoa powder
- 1 tsp baking soda
- ¼ tsp salt
- 26 –28 Candy Cane Hershey’s Kisses
Instructions
- Preheat oven to 350°F (176°C) and line a baking sheet with parchment or a silicone mat.
- Mix flour, cocoa powder, baking soda, and salt; set aside.
- Cream butter and both sugars (except the 3 tbsp for rolling) until light and fluffy.
- Add egg and vanilla; mix well.
- Add dry ingredients and mix until a thick dough forms.
- Roll dough into 1-tablespoon balls.
- Roll each ball in the extra 3 tbsp sugar to coat fully.
- Arrange dough balls on the prepared baking sheet.
- Bake for 6–7 minutes.
- Immediately press a Candy Cane Kiss into the center of each cookie.
- Let cool 2–3 minutes on the pan, then transfer to a rack to cool completely.
Notes
Ingredient Substitutions
- Use dark cocoa powder for a richer chocolate flavor.
- Replace vanilla extract with peppermint extract for extra mintiness.
- Swap Candy Cane Kisses for Hugs, Milk Chocolate, or other seasonal flavors.
Make-Ahead & Storage
- Store cookies in an airtight container for up to 5 days.
- Freeze the baked cookies (unstacked) for up to 2 months.
- Freeze the dough balls separately and bake from frozen—add 1 extra minute.
Serving Variations
- Drizzle with melted white chocolate for decoration.
- Add crushed candy canes on top immediately after baking.
- Roll dough balls in colored sanding sugar for extra sparkle.
Avoid Common Mistakes
- Don’t overbake—cookies should be soft when removed from oven.
- Ensure kisses are unwrapped before baking to work quickly.
- Don’t press the kiss too deeply; just a gentle push is enough.